Join now to get free access for two clients.

No More Data Entry In Tally

Get web portal access Within a Minutes With ‘Setup Free’ Access

Easy to use online Accounting application

User interface is extremely easy for the accountant to use the application

We are ready to help you

Accountants & Bookkeepers

Easy Document Sharing and Reminder functionality

We believe entirely in data security. Your data will remain with you only

A Mobile Application for You and Your Clients

A simple, secure way for your clients to manage Bank Statements, Invoices and Receipts all from the same application

Never stops learning. Smarter with every use

Powered with Artificial Intelligence and IoT capabilities, ScanHisab keeps getting better with data from every use. It upgrades itself with the latest software and gets smarter over time and empowers you to get more done.

We have put some information about how easily you can signup on ScanHisab.


1) Steps for accountant signup
  • - Enter details in repective fields and click on signup.

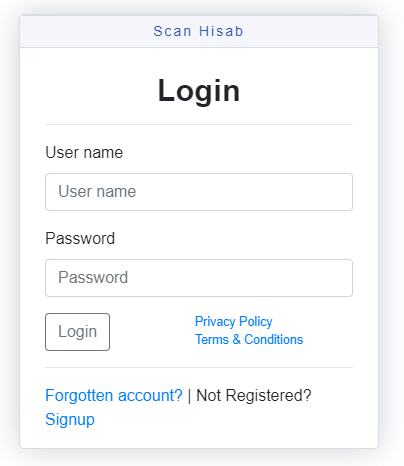
We have put some information about how easily you can Log In on ScanHisab.


1) Steps for Log In on ScanHisab
  • - Click on the link to Log In
  • - Enter your Username and Password in repective fields and click on Login button.

We have put some information about how easily you can connect tally with ScanHisab.


1) Steps to download and install the ScanHisab Tally Connector Setup.
  • - Click on the download setup link to download "ScanHisab Tally Connector Setup." Download Setup
  • - Now you can see the setup has been downloaded to your download location (By Default it will be downloaded to downloads folder on your computer.)
  • - To install "ScanHisab Tally Connector Setup" open the downloaded file having extension of .exe.
  • - If your getting an screen of "Windows protected your PC" then click on "More info" and click on "Run anyway" button.
  • - Now click on run to contiune the setup.
  • - Please wait while the setup prepares some files for installation.
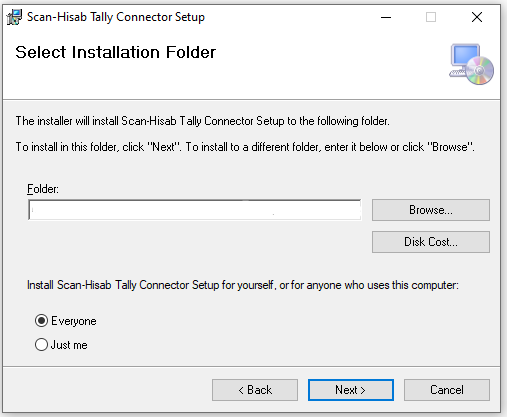
  • - Click on the next to contiune the setup.
  • - Keep the Folder location as it is.
  • - Choose the option for installation :
  •      Everyone : This will install the setup on all computers connected to this computer.
  •      Just me : This will install the setup only on your computer.
  • - Click on the next to contiune the setup.
  • - Please wait while the setup is been installed.
  • - Click on close button. The setup has been successfully installed on your computer.
2) Steps to start ScanHisab Tally Connector Setup.
  • - After the setup is been successfully installed. Go to the desktop of your computer.
  • - Here now you can see the newly added shortcut for "ScanHisab Tally Connector".
  • - Double click on the shortcut and the tally connector will be start.
  • - To verify the tally connector is running or not click on the show hidden icons arrow on taskbar there you can see.
3) Steps to verify whether Tally server is running.
  • - Start tally on your computer and click this link Test
  • - If you get respone like this "Tally 9 Server is Running" then the tally server is running else restart tally.

We have put some information about how easily you can Upload, Review your bank statement's on ScanHisab and export them to tally.


1) Steps for Uploading bank statement's
  • - Select bank and now click on inbox.
  • - Select bank from dropdown for which your uploading statement.
  • - Click "Choose File" button to upload statement for the bank. (File should be PDF, JPEG, TIFF, XLS, XLSX, CSV and Max size: 15MB)
  • - Select the checkbox if your file is password protected and enter file password in the textbox.
  • - Click on "Upload Files to ScanHisab" button to upload the bank statement.
2) To view uploaded bank statement's
  • - Select bank and now click on statements.
  • - Here now you can see all your uploaded bank statement's.
  • - If you want to see more than "10" statements at a time select "Show entries" on top left corner to increase entries as per your need.
  • - Click on the statement which you want view.
  • - Now you can see your statement and properties and history of the statement in the respective fields.
3) To review uploaded bank statement's
  • - Select bank and now click on statements.
  • - Here now you can see all your uploaded bank statement's.
  • - Check the Status of the statement if it is "In Process" Please wait until it is "Review".
  • - Click on the review button of the statement which you want review.
  • - Now the review window will open with the statement and details.
4) Export bank statement's to Tally
  • - Select bank and now click on statements.
  • - Here now you can see all your uploaded bank statement's.
  • - Click on "Tally" button of the statement which you want export to Tally.
  • - Now here you can see all the transaction of the statement.
  • - If you want to add an Manual Entry Click on "Manual Entry" Button and fill all the respective details.
  • - Select the transaction's which you want to export and click on "Export to Tally" button.
  • - Check your Tally is running. Now click on "Get Tally Ledger" to get all your ledger's for current company.
  • - If you want to create new particular click on "Particular" button and fill respective fields and click on "Create" button.
  • - Select Account, Particulars and Voucher Type as your need and click on "Export to Tally" button.
  • - Thus now you can see the transaction's has been exported to your Tally.
5) Export bank statement's to Excel
  • - Select bank and now click on statements.
  • - Here now you can see all your uploaded bank statement's.
  • - Click on "Excel" button of the statement which you want export to Excel.
  • - Thus now you can see the Excel file is been downloading to your download location.

We have put some information about how easily you can Upload, Review your Purchase Invoice's on ScanHisab and export them to tally.


1) Steps for Uploading Purchase Invoice's
  • - Select Purchase and now click on inbox.
  • - Click "Choose File" button to upload invoice's. (File should be PDF, JPEG, TIFF and Max size: 15MB)
  • - Select the checkbox if your file is password protected and enter file password in the textbox.
  • - Click on "Upload Files to ScanHisab" button to upload invoice's.
2) To view uploaded Purchase Invoice's
  • - Select Purchase and now click on Invoices.
  • - Here now you can see all your uploaded Purchase invoice's.
  • - If you want to see more than "10" Invoices at a time select "Show entries" on top left corner to increase entries as per your need.
  • - Click on the invoice which you want view.
  • - Now you can see your invoice and properties and history of the document in the respective fields.
3) To review uploaded Purchase Invoice's
  • - Select Purchase and now click on Invoices.
  • - Here now you can see all your uploaded Purchase invoice's.
  • - Check the Status of the invoice if it is "In Process" Please wait until it is "Review".
  • - Click on the review button of the invoice which you want review.
  • - Now the review window will open with the invoice and details.
4) Export Purchase Invoice's to Tally
  • - Select Purchase and now click on Invoices.
  • - Here now you can see all your uploaded Purchase invoice's.
  • - Click on "Tally" button of the invoice which you want export to Tally.
  • - If you want to export multiple invoice's. Select the invoice's and click on "Export to Tally" button.
  • - Now here you can see details of all invoice's which you selected.
  • - Check your Tally is running. Now click on "Get Tally Ledger" to get all your ledger's for current company.
  • - If you want to create new particular click on "Particular" button and fill respective fields and click on "Create" button.
  • - If you want to auto create party then check "Is Auto create party by Supplier" checkbox.
  • - Select Party A/c name, Purchase Ledger, IGST, CGST, SGST, Round off and Discount as your need and click on "Export to Tally" button.
  • - Thus now you can see the your invoice's has been exported to your Tally.
5) Export Purchase Invoice's to Excel
  • - Select Purchase and now click on Invoices.
  • - Here now you can see all your uploaded Purchase invoice's.
  • - Click on "Excel" button of the invoice which you want export to Excel.
  • - If you want to export multiple invoice's then select the invoice's and click on "Export" button on top right side.
  • - Thus now you can see the Excel file is been downloading to your download location.

We have put some information about how easily you can Upload, Review and Create your Sales Invoice's on ScanHisab and export them to tally.


1) Steps for Uploading Sales Invoice's
  • - Select Sales and now click on inbox.
  • - Click "Choose File" button to upload invoice's. (File should be PDF, JPEG, TIFF OR .xlsx(Excel) and Max size: 15MB)
  • - Click on download link to download sample template for creating sales Invoice's Click to download
  • - Select the checkbox if your file is password protected and enter file password in the textbox.
  • - Click on "Upload Files to ScanHisab" button to upload invoice's.
2) Steps for Creating Sales Invoice's
  • - Select Sales and now click on inbox.
  • - Here now you can see block of "Manual Invoice's" click on "Invoice" button to create sales invoice.
  • - Now select the customer, invoice date, due date, category for sales invoice.
  • - To add Item in your sales invoice click on "Item" button.
  • - If you want to add new product click on "+" icon next to products dropdown.
  • - Now select Product, Update rate, quanity, taxable amount, discount and add description and click on "Add" button.
  • - Add Round off amount if applicable. And add Notes(It Won’t be displayed on the invoice. Only for your internal use.)
  • - Click on "Save" button to create sales invoice.
3) To view uploaded Sales Invoice's
  • - Select Sales and now click on Invoices.
  • - Here now you can see all your uploaded Sales invoice's.
  • - If you want to see more than "10" Invoices at a time select "Show entries" on top left corner to increase entries as per your need.
  • - Click on the invoice which you want view.
  • - Now you can see your invoice and properties and history of the document in the respective fields.
4) To review uploaded Sales Invoice's
  • - Select Sales and now click on Invoices.
  • - Here now you can see all your uploaded Sales invoice's.
  • - Check the Status of the invoice if it is "In Process" Please wait until it is "Review" (If the invoice is manually created then status will be "Ready" by default.).
  • - Click on the review button of the invoice which you want review.
  • - Now the review window will open with the invoice and details.
5) Export Sales Invoice's to Tally
  • - Select Sales and now click on Invoices.
  • - Here now you can see all your uploaded Sales invoice's.
  • - Click on "Tally" button of the invoice which you want export to Tally.
  • - If you want to export multiple invoice's. Select the invoice's and click on "Export to Tally" button.
  • - Now here you can see details of all invoice's which you selected.
  • - Check your Tally is running. Now click on "Get Tally Ledger" to get all your ledger's for current company.
  • - If you want to create new particular click on "Particular" button and fill respective fields and click on "Create" button.
  • - If you want to auto create party then check "Is Auto create party by Customer" checkbox.
  • - Select Party A/c name, Sales Ledger, IGST, CGST, SGST, Round off and Discount as your need and click on "Export to Tally" button.
  • - Thus now you can see the your invoice's has been exported to your Tally.
5) Export Sales Invoice's to Excel
  • - Select Sales and now click on Invoices.
  • - Here now you can see all your uploaded Sales invoice's.
  • - Click on "Excel" button of the invoice which you want export to Excel.
  • - If you want to export multiple invoice's then select the invoice's and click on "Export" button on top right side.
  • - Thus now you can see the Excel file is been downloading to your download location.